
I’ve been messing about with face detection for a while, and was surprised how easy it is to get basic detection working out-of-the-box with open-source libraries.
Today we’ll look at a simple way to get started with face detection on OSX using python.
We’re going to be using the OpenCV computer vision library, originally developed by Intel but subsequently released under the BSD license.
We’re going to use Homebrew to install everything. I’ve also had success installing OpenCV from MacPorts, as well as compiling it from source, but Homebrew seems to be the easiest and cleanest option these days.
> brew install opencv
This ran for about 5 minutes trying to install cmake, at which point I ran into an error :
ld: symbol(s) not found
collect2: ld returned 1 exit status
make[2]: [bin/ccmake] Error 1
make[1]: [Source/CMakeFiles/ccmake.dir/all] Error 2
make: *** [all] Error 2
Exit status: 2
There was a note in the homebrew error message pointing to this GitHub issue (I wish more package managers did this!) which had a few comments suggesting that updating Homebrew and reinstalling cmake would fix the problem :
> brew update
> brew install -v cmake
With this update done, installing opencv proceeded without problems :
> brew install opencv
You probably also need to update your PYTHON_PATH (thanks Duncan for pointing this out) :
> export PYTHONPATH="/usr/local/lib/python2.6/site-packages/:$PYTHONPATH"
You can add the export command to your ~/.profile file if you want to avoid having to do this in the future.
The Homebrew install should come with python bindings built-in - to make sure everything is working, start the python interpreter and type import cv :
> python
Python 2.7 (r27:82500, Sep 10 2010, 08:44:08)
[GCC 4.2.1 (Apple Inc. build 5664)] on darwin
Type "help", "copyright", "credits" or "license" for more information.
>>> import cv
>>>
If you don’t get any errors, you’re good to go!
Next, we need a simple python script to do the actual face detection. Luckily, the OpenCV source comes with a bunch of examples - here’s their facedetect.py example :
#!/usr/bin/python
"""
This program is demonstration for face and object detection using haar-like features.
The program finds faces in a camera image or video stream and displays a red box around them.

Original C implementation by:  ?
Python implementation by: Roman Stanchak, James Bowman
"""
import sys
import cv
from optparse import OptionParser

* Parameters for haar detection
* From the API:
* The default parameters (scale_factor=2, min_neighbors=3, flags=0) are tuned
* for accurate yet slow object detection. For a faster operation on real video
* images the settings are:
* scale_factor=1.2, min_neighbors=2, flags=CV_HAAR_DO_CANNY_PRUNING,
* min_size=<minimum possible face size

min_size = (20, 20)
image_scale = 2
haar_scale = 1.2
min_neighbors = 2
haar_flags = 0

def detect_and_draw(img, cascade):
    # allocate temporary images
    gray = cv.CreateImage((img.width,img.height), 8, 1)
    small_img = cv.CreateImage((cv.Round(img.width / image_scale),
             cv.Round (img.height / image_scale)), 8, 1)

    # convert color input image to grayscale
    cv.CvtColor(img, gray, cv.CV_BGR2GRAY)

    # scale input image for faster processing
    cv.Resize(gray, small_img, cv.CV_INTER_LINEAR)

    cv.EqualizeHist(small_img, small_img)

    if(cascade):
        t = cv.GetTickCount()
        faces = cv.HaarDetectObjects(small_img, cascade, cv.CreateMemStorage(0),
                                     haar_scale, min_neighbors, haar_flags, min_size)
        t = cv.GetTickCount() - t
        print "detection time = %gms" % (t/(cv.GetTickFrequency()*1000.))
        if faces:
            for ((x, y, w, h), n) in faces:
                # the input to cv.HaarDetectObjects was resized, so scale the
                # bounding box of each face and convert it to two CvPoints
                pt1 = (int(x * image_scale), int(y * image_scale))
                pt2 = (int((x + w) * image_scale), int((y + h) * image_scale))
                cv.Rectangle(img, pt1, pt2, cv.RGB(255, 0, 0), 3, 8, 0)

    cv.ShowImage("result", img)

if __name__ == '__main__':

    parser = OptionParser(usage = "usage: %prog [options] [filename|camera_index]")
    parser.add_option("-c", "--cascade", action="store", dest="cascade", type="str", help="Haar cascade file, default %default", default = "/usr/local/Cellar/opencv/2.2/share/opencv/haarcascades/haarcascade_frontalface_default.xml")
    (options, args) = parser.parse_args()

    cascade = cv.Load(options.cascade)

    if len(args) != 1:
        parser.print_help()
        sys.exit(1)

    input_name = args[0]
    if input_name.isdigit():
        capture = cv.CreateCameraCapture(int(input_name))
    else:
        capture = None

    cv.NamedWindow("result", 1)

    if capture:
        frame_copy = None
        while True:
            frame = cv.QueryFrame(capture)
            if not frame:
                cv.WaitKey(0)
                break
            if not frame_copy:
                frame_copy = cv.CreateImage((frame.width,frame.height),
                                            cv.IPL_DEPTH_8U, frame.nChannels)
            if frame.origin == cv.IPL_ORIGIN_TL:
                cv.Copy(frame, frame_copy)
            else:
                cv.Flip(frame, frame_copy, 0)

            detect_and_draw(frame_copy, cascade)

            if cv.WaitKey(10) >= 0:
                break
    else:
        image = cv.LoadImage(input_name, 1)
        detect_and_draw(image, cascade)
        cv.WaitKey(0)

    cv.DestroyWindow("result")
One minor change I made was updating the path to haarcascade_frontalface_default.xml on line 117 - I’ve hard-coded in the path to the file installed by Homebrew in the example above for simplicity.
Save the script above as facedetect.py, grab a sample image to test it on, and you should be able to run it with regular mac python :
> python facedetect.py example.jpg
The command above will launch a python window containing the image, with red boxes surrounding detected faces.
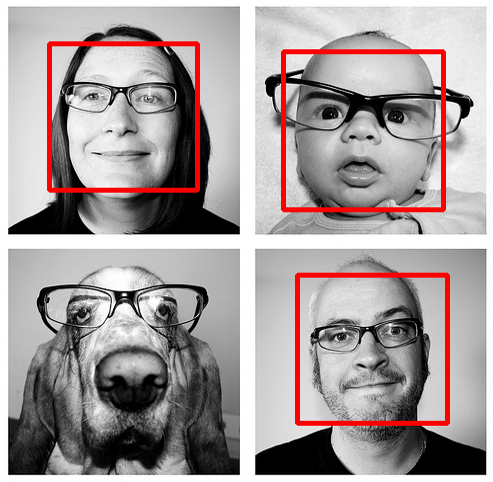
Here’s the result of running the script on some random creative-commons photos tagged with ‘family’ on Flickr :
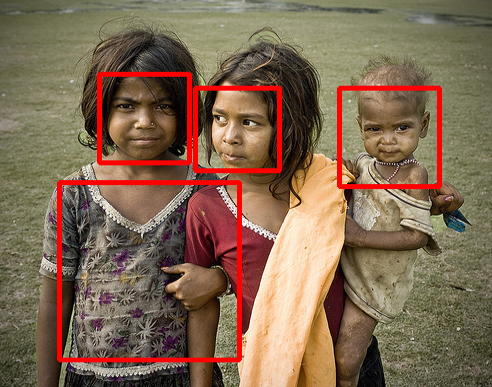
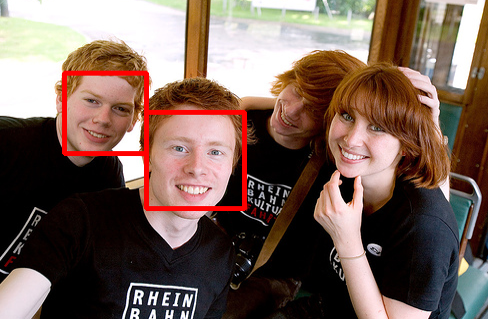
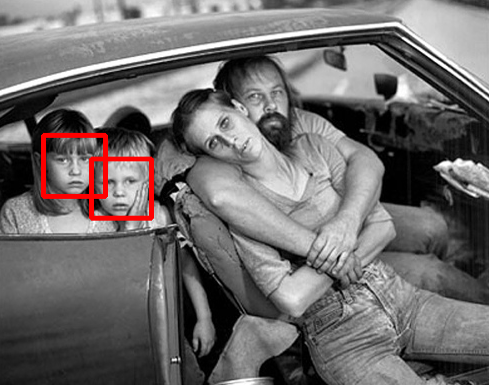
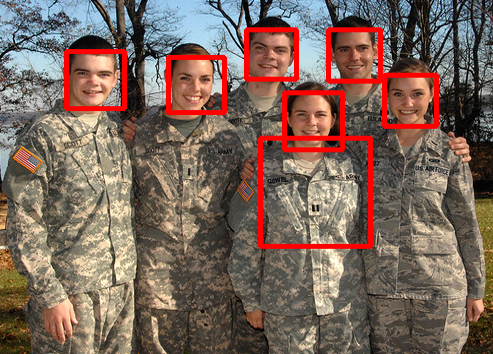
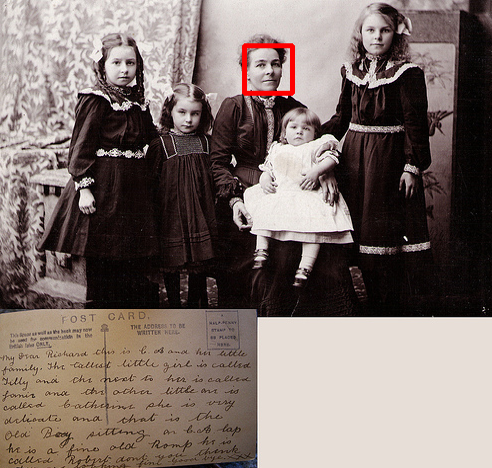
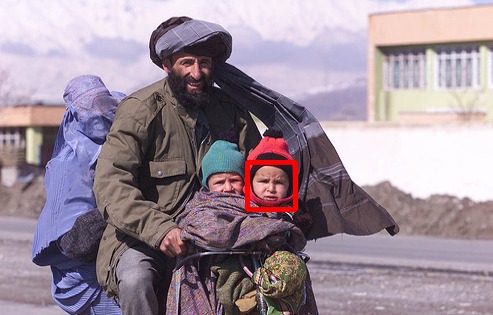
As you can see, the results are mixed. Full-frontal faces work best (because we’re using haarcascade_frontalface_default.xml to do the detection), as do medium-resolution images. I’ve found that processing very high-res images can result in a lot of false positives, since the image has so much detail.
The example above can also process real-time video from the camera on your Mac - instead of using a filename as an argument, input the camera number you wish to use (zero for most Macs) :
> python facedetect.py 0
If you feel like digging in a little deeper, there’s various other training data sets in /usr/local/Cellar/opencv/2.2/share/opencv/haarcascades/ for detecting other shapes (such as full bodies, eyes, noses etc), which open up some cool possibilities.
Enjoy!