
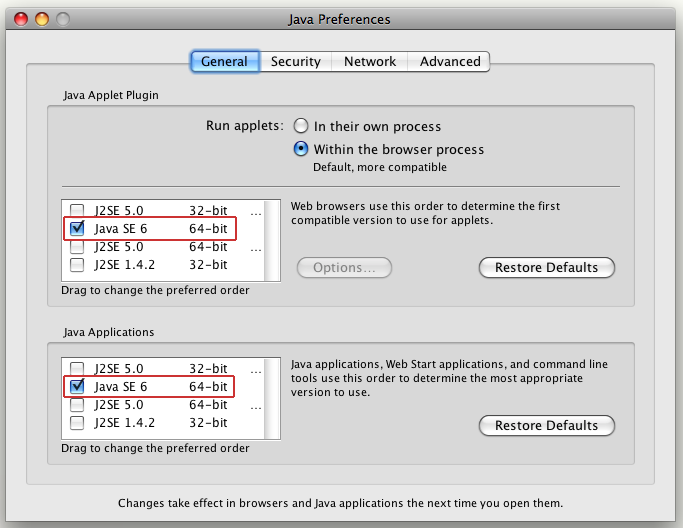
First, you need to make sure you are using java 1.6. I’m told this method will only work on 64-bit leopard machines, so your mileage may vary. In the finder, browse to /Applications/Utilities and open Java Preferences.app .
- Make sure only the Java SE 6 64-bit options are enabled (a word of caution - Flex Builder doesn’t work with these settings - you’ll need to change them back to use it).
- You can check your java version by typing java -version in a terminal - you should get the following output.
> java -version
java version "1.6.0_17"
Java(TM) SE Runtime Environment (build 1.6.0_17-b04-248-9M3125)
Java HotSpot(TM) 64-Bit Server VM (build 14.3-b01-101, mixed mode)
- Set JAVA_HOME so it matches your new java version
> export JAVA_HOME=/System/Library/Frameworks/JavaVM.framework/Versions/1.6/Home
- You should now be able to build red5 :
> svn checkout http://red5.googlecode.com/svn/java/server/trunk/ red5-trunk
> cd red5-trunk
> make
ant dist
Buildfile: build.xml
.....
.....
.....
BUILD SUCCESSFUL
Total time: 2 minutes 31 seconds
- Now you should be able to run your newly-built red5 server. Note - make sure you use the *.sh files that were created in the dist folder to run it:
> cd dist
> ./red5.sh
Running on  Darwin
Starting Red5
.....
.....
.....
[INFO] [Launcher:/installer] org.red5.server.service.Installer - Installer service created
- Now you can copy this dist folder to wherever you want your red5 install to live - eg. /Applications/Red5
> cd ../
> cp -R dist /Applications/Red5
Once you get all this working, i recommend you install the eclipse red5 plugin, and create a red5 eclipse project if you’re interested in going further.